Nail Trends: One Silver Nail — How to Do it Right

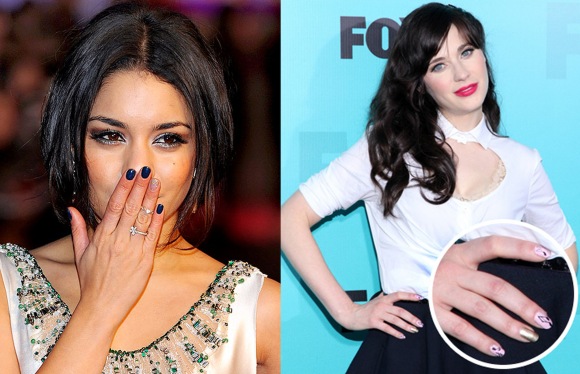
Lately, I have seen so many people with nails that set the ring finger apart.

Image

photos from glamourousgamergirls.files.wordpress.com and sheknows.com

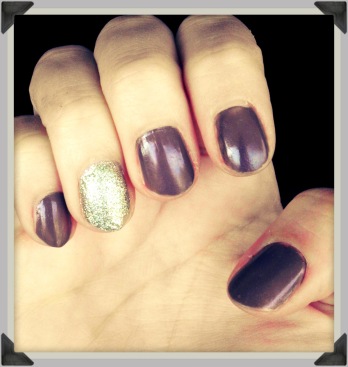
I don’t like the huge pieces of glitter I have seen that make the manicure look over-the-top and tacky.  I was going for something a little more classy.  Plus, I think this look is festive enough for winter too.  I plan on switching up the color from purple to navy blue or red for the holiday season.

Image

  • The perfect amount of sparkle comes from Essie’s Beyond Cozy.  The sparkles are very fine and dainty, rather than chunky, which I love.  Also, I found that, unlike many sparkle polishes, you do not have to do five layers to get the full-on sparkle effect.  This look was done with only two layers.
  • I complemented this with a subtle gray-purple: Rimmel London’s Lasting Finish Pro in the color Steel Grey.  I was really surprised at how fast this lacquer dried and though the name hints nothing at its lavender hue, it certainly is more of a shade of purple than a shade of grey (heh heh.)

Hope your upcoming holiday season is bright and merry!

A Summery Beachy Bracelet

Make them for a beach themed/pool party… Fairly easy and inexpensive to make!

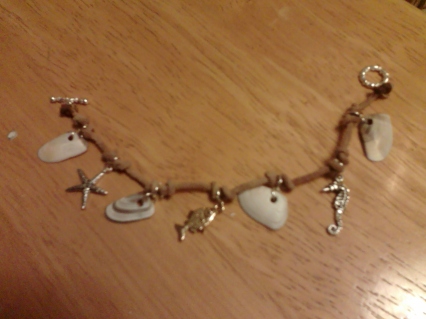
While in Havasu, I noticed the whole beach area was covered with these oblong shells, and stated gathering a few with more unusual coloring.  When I got back, I combined the shells with a few beachy charms to make this summer-inspired bracelet.

Image

Need:

-About a foot (maybe foot and a half, to be safe) leather cord

-small shells with hole drilled in them (be careful when drilling!  Use the really strong drill bits and practice a few times before using the shells you plan on using in the actual bracelet.  I broke a few shells in this process.) (I used four shells, but depending on how long the bracelet it to be, you can add more.  This bracelet is on the shorter side for me.)

-Beach related charms.  I used three, as you can see.  You might want to add more.

-Clasp

-Jumprings.  You need as many as you have shells and charms combined.  Plus one for each end of the clasp.  So I used nine.

-Superglue to make the end knots stay tight.


How to:

Attach a jumpring to one end of the clasp, and tie on end of the cord to the jumpring, really tight.  I used superglue to glue this knot so it would stay tied.

Attach all shells and charms to a jumpring.

Leaving about a half inch or so of room, tie a knot in the cord.  String on first shell through its jumpring, then tie a knot on the other side of the jumpring.

Leave another half an inch or so before tying the next knot, then string on a charm by the jumpring.  Tie another knot.

Repeat this process, switching between shells and charms.

Continue until bracelet is of desired length.

Attach jumpring to other end of clasp and tie jumpring to end of cord…

Flaunt your new bracelet.

How to Make a Bird’s Nest Necklace

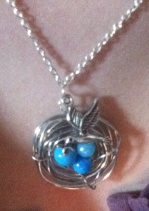
This necklace is really easy.  And it’s pretty much foolproof, since a large part of the process is just sort of crinkling up and making a bunch of wire look messy.  I liked adding a bird charm on mine, and after making this first one, I tried different variations of the same necklace with different color beads and wire.  For the next one, I used thick brown wire and three pearls for the eggs.
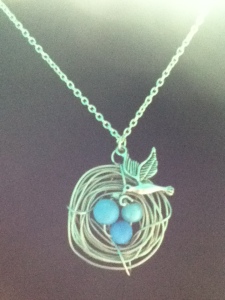
What you need:

-a few feet of 20-24 gauge wire.  It needs to be thick enough for you to bend with your fingers, but tough enough that it stays in place after the necklace is made and while it is actually being worn.  I believe I used 22 gauge.

-three beads of similar size that represent the bird’s eggs

-desired amount of necklace chain and clasp

-bird charm (I guess this could be optional)

-basic jewelry making tools

1.) You begin by stringing each bead onto the end of the wire, kinking the wire between each bead so they sit in a circle.

2.)  Then, with the remaining wire, wrap a circle out of the wire around the outer edge of the beads.  Mine was about an inch and a half in diameter.  Keep wrapping around this original circle, but try to vary the circles slightly.  Make some slightly larger, some crooked, some smaller, so the end result is a sort of messy bird’s nest.

Make sure to wrap a little extra on the back so the back of the necklace is heavier than the front.  The first nest necklace I made has a tendency to flip over (the eggs like to gravitate towards me) because they are so heavy.  On the second one, I made sure to compensate for this by making the back heavier with extra wire.  Just something to keep in mind.

3.)  When your nest looks adequate in thickness, wrap a few last pieces in and out of the middle hole to hold the nest together.  These are almost perpendicular to the wires of the circle, but should appear to be sort of loosely holding the whole thing together.
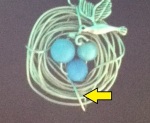
Not to get too complicated, but this is what I mean.

4.) Attach jump-ring to perpendicular wrapping at what will be the top of the nest.  Attach another jump-ring to this one, so the necklace will face the correct direction.

The two jump-rings between the nest and the chain.

5.)  Attach the bird charm if you have one you would like to use.  I attached mine to the higher of the two jumprings.

6.) String the chain through the top jump-ring; attach clasp.

7.) Frolic in a meadow gracefully! Springtime!
Not Overbearingly Sweet White Frosting for Perfect Red Velvet Cupcakes

So for my roommate’s birthday, I made red velvet cupcakes.  Yes, from a box.  I admit it.

Oh, they were soooo perfect.  So beautiful.  Moist.  Delicious.  The frosting was perfect, not too thick or runny or sweet.  It was the perfect cupcake ever, and the frosting actually was kind of an alternate version of what the cookbook reccomended.  Usually, substituations don’t work for me.  Ususally I end up with some crazy weird tasting mess and when people take a bite, I have to warn them: “Just keep in mind, I did this ONE little thing wrong, which I can do better next time.  Oh, but don’t stop eating it, it’s not that bad.  It’s pretty good.  Kind of…”

Aha! But not this time!  This time they were perfect.  My roommate said they were the best red velvet cupcakes she had ever had.  I will take that.  BEST RED VELVET CUPCAKES EVER!

While I can’t necessarily take credit for Duncan Hines’ recipe, (I think it was Duncan Hines?  Don’t quote me on that one) I can share my small little advice I have with all baked goods: never overcook them.  When the box says to bake them for 19-24 minutes, I set my timer for eighteen.  And usually, they are done at eighteen.  These were.  They were perfect.  You don’t want to cook them any longer than what takes them to be done.  Undercooking them slightly keeps them moist.  If eighteen minutes (or whatever the lowest time the box recommends) isn’t enough, put them back in the oven for a minute or two and keep checking back to see if they’re done.  So many people just see 19-24 minutes on the box and set the timer for 21-23 minutes.  This is why the world is a cruel, cruel place.

Okay, so the frosting.  You want to make sure it isn’t too sweet.  I thirded my original recipe because I didn’t have that many cupcakes (four cups of powdered sugar seemed a little much for fifteen cupcakes…) (maybe I should not have eaten like six cupcakes’ worth of batter…whoops.) and I changed it up a little.  Here is what I ended up with:

Not-too-Sweet White Frosting

– 1/3 cup butter (I used margarine, so mine was kinda yellower than it could have been)

-1/2 teaspoon vanilla

-2 cups powdered sugar (you might have to add more to get the right consistency)

– 1 small tablespoon milk (you can leave this out if your frosting is really liquidy already)

First, combine the butter and the vanilla by hand.  If you are making a huge batch, I suppose a mixer wouldn’t hurt, but you don’t want it to become too whipped.  Gradually add some powdered sugar, add milk, and then continue adding powdered sugar until the frosting is thick enough to frost with.  No drippage should be happening.

And then I frosted them and it was beautiful.  Glorious.  Magnificent.  There were eagles soaring in the sky.

Yes, it was that good.

The Cake Pop That Made Me Think I Was Good At Making Cake Pops

Ta-daaa!

These were my first attempt at cake popping.  Yes, I know they don’t have a stick in them.  This actually made it so much easier.  And they didn’t have to be perfectly round (also a plus).  They are at the beginning of Bakerella’s Cake Pop book for a reason.  They are freakin’ easy compared to any other cake pop-esque treat.

The trick is that you use this mold (I got mine from JoAnn’s) and follow these lovely guidelines, as I did.

Need: colored chocolate, cake, cream cheese frosting, M&Ms, sprinkles.  No crazy cake popping talent required.  Only patience.  Lots of patience!  If you are just experimenting or making cake pops on your own, I recommend only making half the cake bites…it takes FOREVER!

These actually looked surprisingly like they are intended to look.  Success!

Easter Cake Pops: Cake Pops Revisited

Cake Pops are my nemesis.  Well, they aren’t exactly, but they are one of those things that looks sooo perfect in the cookbook and is promised to be sooo easy and is actually a very stressful, painful process.  If you are crazy like me, you will continue attempting to make cake pops despite your lack of success.  You will slowly climb the Cake Pop Mt. Everest and finally reach the top!

Maybe.

Today’s stop: Cake Pops for Easter.

Technically you could use this post for tips on any sort of cake popping — it’s the technique that I’m trying to get down.  And I want others to go in knowing what I have now learned through experience.

These were baby chicken cake pops…

Inside: chocolate cake from a mix baked in a Cake Pop Pan.  This is a marvelous invention!  My tip to you is if you have one of these, perhaps don’t fill the little round holes super full because then they come out of the oven looking like little Saturns.

Outside:

-Yellow baking chocolate.  (Melting tip: use a double boiler and keep the water at about 100 degrees, to the point where the water is warm, but cool enough to touch with your bare finger.)

-Yellow and orange tiny rainbow chip sprinkles.  They look like teeney tiny Hershey kisses but colored and candy-coated.  You need two yellow ones per chick for the wings (see either side) and one orange one for the beak.

-Orange sprinkles in the shape of a chicken foot.  Anything sort of star-shaped or even flower-shaped seems to work.

-Edible pen.  Actually bought one this time.  Only it didn’t work.  Going to try a different brand next time. The pen worked for like one chick and then stopped working.  This must be one of the first chickens to receive eyes.  The later chickens have terrifying crazy eyes with either the red pen (zombie-chicken?) or the blue pen gone wild (rabid-chicken?).

TIPS:

-When dipping the cake balls into chocolate, poke the hole in the cake ball first.  Dip the stick in chocolate.  Insert chocolate stick into hole.  Let dry.  Be very gentle with it afterwards, as this form of “gluing” is not very secure.

-When dipping the whole cake ball, don’t dip the whole ball into the bowl of chocolate.  The cake ball will fall off and you will be very sad and without a normal-ish looking chicken.  Rather, have a large, deep plastic spoon full of chocolate in one hand and with the other hand, carefully twirl the cake pop in the chocolate of the spoon while only letting the cake pop sort of graze the chocolate, and not smash against the spoon.  Spoon smashing results in lost cake pop ball again.  We would like to prevent this.

How to Make Turkey Cake Pops that Don’t Suck as Bad as Mine

So I have been wanting to make really cute cake pops for awhile now and finally Kathryn and I got the chance to.  We had the cookbook but Bakerella post it on her website as well.  (http://www.bakerella.com/youll-want-to-gobble-these-right-up/).  Trying this recipe, I learned a few things I wish I had known beforehand.

Here is what the turkeys turned out as…

Here’s what I would have liked to have known before:

1) When making any sort of cake pop, you can’t just stick cake on the stick and then dip it into the chocolate.  The cake will fall off the stick and die in the chocolate and you will cry.  Apparently the secret is to dip the stick into the chocolate, then the cake ball.  Then let it harden like glue to keep the cake on the stick and dip it into the chocolate.  Well, we didn’t know this beforehand and as a result, our turkeys ended up stick-less.  LESSON LEARNED!

2) Bakerella calls for chocolate covered expresso beans.  However, the only chocolate covered expresso beans I found were either a) so dark you wouldn’t be able to see the turkey’s black eyes or b) way expensive.  Not wanting to spend $40 on cake pop turkey’s, I opted against the Trader Joe’s chocolate covered expresso beans and decided to try out Milk Duds.  A box of Milk Duds was more like $1.50 instead of $5+

3) I didn’t have a edible ink black pen.  If you already have one on hand, great, use it!  But I did not.  One of the few things in my kitchen I don’t have.  Michael’s sells a box of four colored edible ink pens for $9.  Having no coupon or need for the other three colored pens in the pack, I skipped this ingredient.  Since the only use of the pen were the two tiny dot eyes, I decided to use a fine tipped Sharpie instead and not tell anyone… Shhh!

Come Christmas time, I will have this cake pop thing down!

How to Make a Jewelry/ Earring Hanger Using a Frame

I’ve seen this idea a few other places, but it was finally time for me to put it into practice!

Here are some key tips I wish I had known before I set out:

* They do not sell the wire mesh at Michael’s.  Your best bet is a hardware store like Ace.  That’s where I found mine.

* It is not necessary to use a staple gun to attach the mesh. Hot glue works just fine. I found out that the staple gun did not work very well for me. The staple kept hitting the wire mesh and going all over the place and I just had to pull all the staples out. HOT GLUE! Lots of it!

*Attach the wire mesh to the inside edge of the frame.  You know, the groove where you would normally set a picture in if you were using the frame for actual frame purposes. If you just staple/glue the wire mesh to the back, the earring wires will not have extra room behind the mesh to hang.

But don’t get me wrong, it actually is a pretty easy  and quick project if you do it right the first time.  Which you can, using those tips I just gave you.  I had to take mine apart a few times. :/

OK.

So you need:

1.) Hot glue gun (or a staple gun if you are feeling adventurous)

2.) Frame.  I painted an 8×10 inch frame. Minus the glass and backing and stuff.

3.) Wire Mesh.  Or screen. Or something of that variety.

That’s it!

-Cut out a piece of wire mesh that entirely fits the inside groove area in the frame.  Just like if you were putting a photo in there.

-Glue said mesh in place. I put the mesh in first, then layered lots of hot glue on top and all around to keep it in there!

..And that’s it!  See? it’s really simple.  I promise.

Romantic Rose Garland Bracelet

TOOLS NEEDED:

-Hot Glue Gun

-Wire cutters

Materials Needed:

–Twine/Hemp/ Leather cord

-Small Roses (like 5 or 6)

– 2 jump rings (gold)

– 1 clasp (gold)

– 24 gauge wire (gold)

– wire cutters

First, attach the jump rings by hot gluing the end of the twine to itself, forming a loop at each end of the twine.  Put each jumpring on each loop. Attach the clasp and end of the clasp to the jumprings.  Now you will have the piece of twine with a clasp on it.

Now to add the roses…

Take a few inches of the gold wire and stick it through a few threads on the back of one rose.  Pull the rose to the middle of the wire and wrap each end of the wire around the cord.  Cut off the excess long ends you don’t want.  Repeat this process every few inches on the cord with each rose.

Add a few more wire wraps here and there on the twine between roses for an added detail.  You can also wire wrap the end of the twine where the twine is hot glued around the jumprings – just to keep the twine in its place there!

How to Make Easy and Beautiful Hoop Earrings

I saw some beaded hoop earrings at Anthropologie and they didn’t look too difficult to make. These are my first beaded hoop earrings.

This tutorial will show you how it’s done. For the tutorial, I made these lovely purple, smaller hoops. The process for any different size, color, or shape hooped earrings is the same, so long as the beads fit on the hoop.

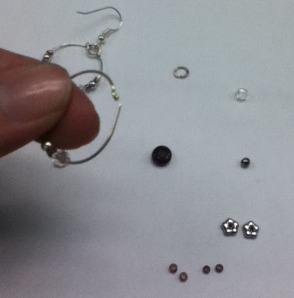
To make these purple hoops, you need:

Note that the image shows the supplies needed for ONE hoop. The numbers depict the amount needed for both hoops together.

First line up your beads in the order you want them to appear on the hoops. Then, start sliding the beads on the hoop.

This is what it will look like:

When you are done with that, you need to make a loop in the non-looped end of the hoop. Using round nose pliers, make a loop at the end of the hoop. Ooops that rhymes!

Now close the hoop by attaching a jumpring to each loop. Attach the earring wire to the jumpring and wha-la! Earrings!

Previous Older Entries